Projects
This is the second tab of the Manage Organization panel: the list of all organization projects, with the option to open the details of each one to manage its data sources, additional classification rules, and (optionally) its own Flow Metrics boundaries.
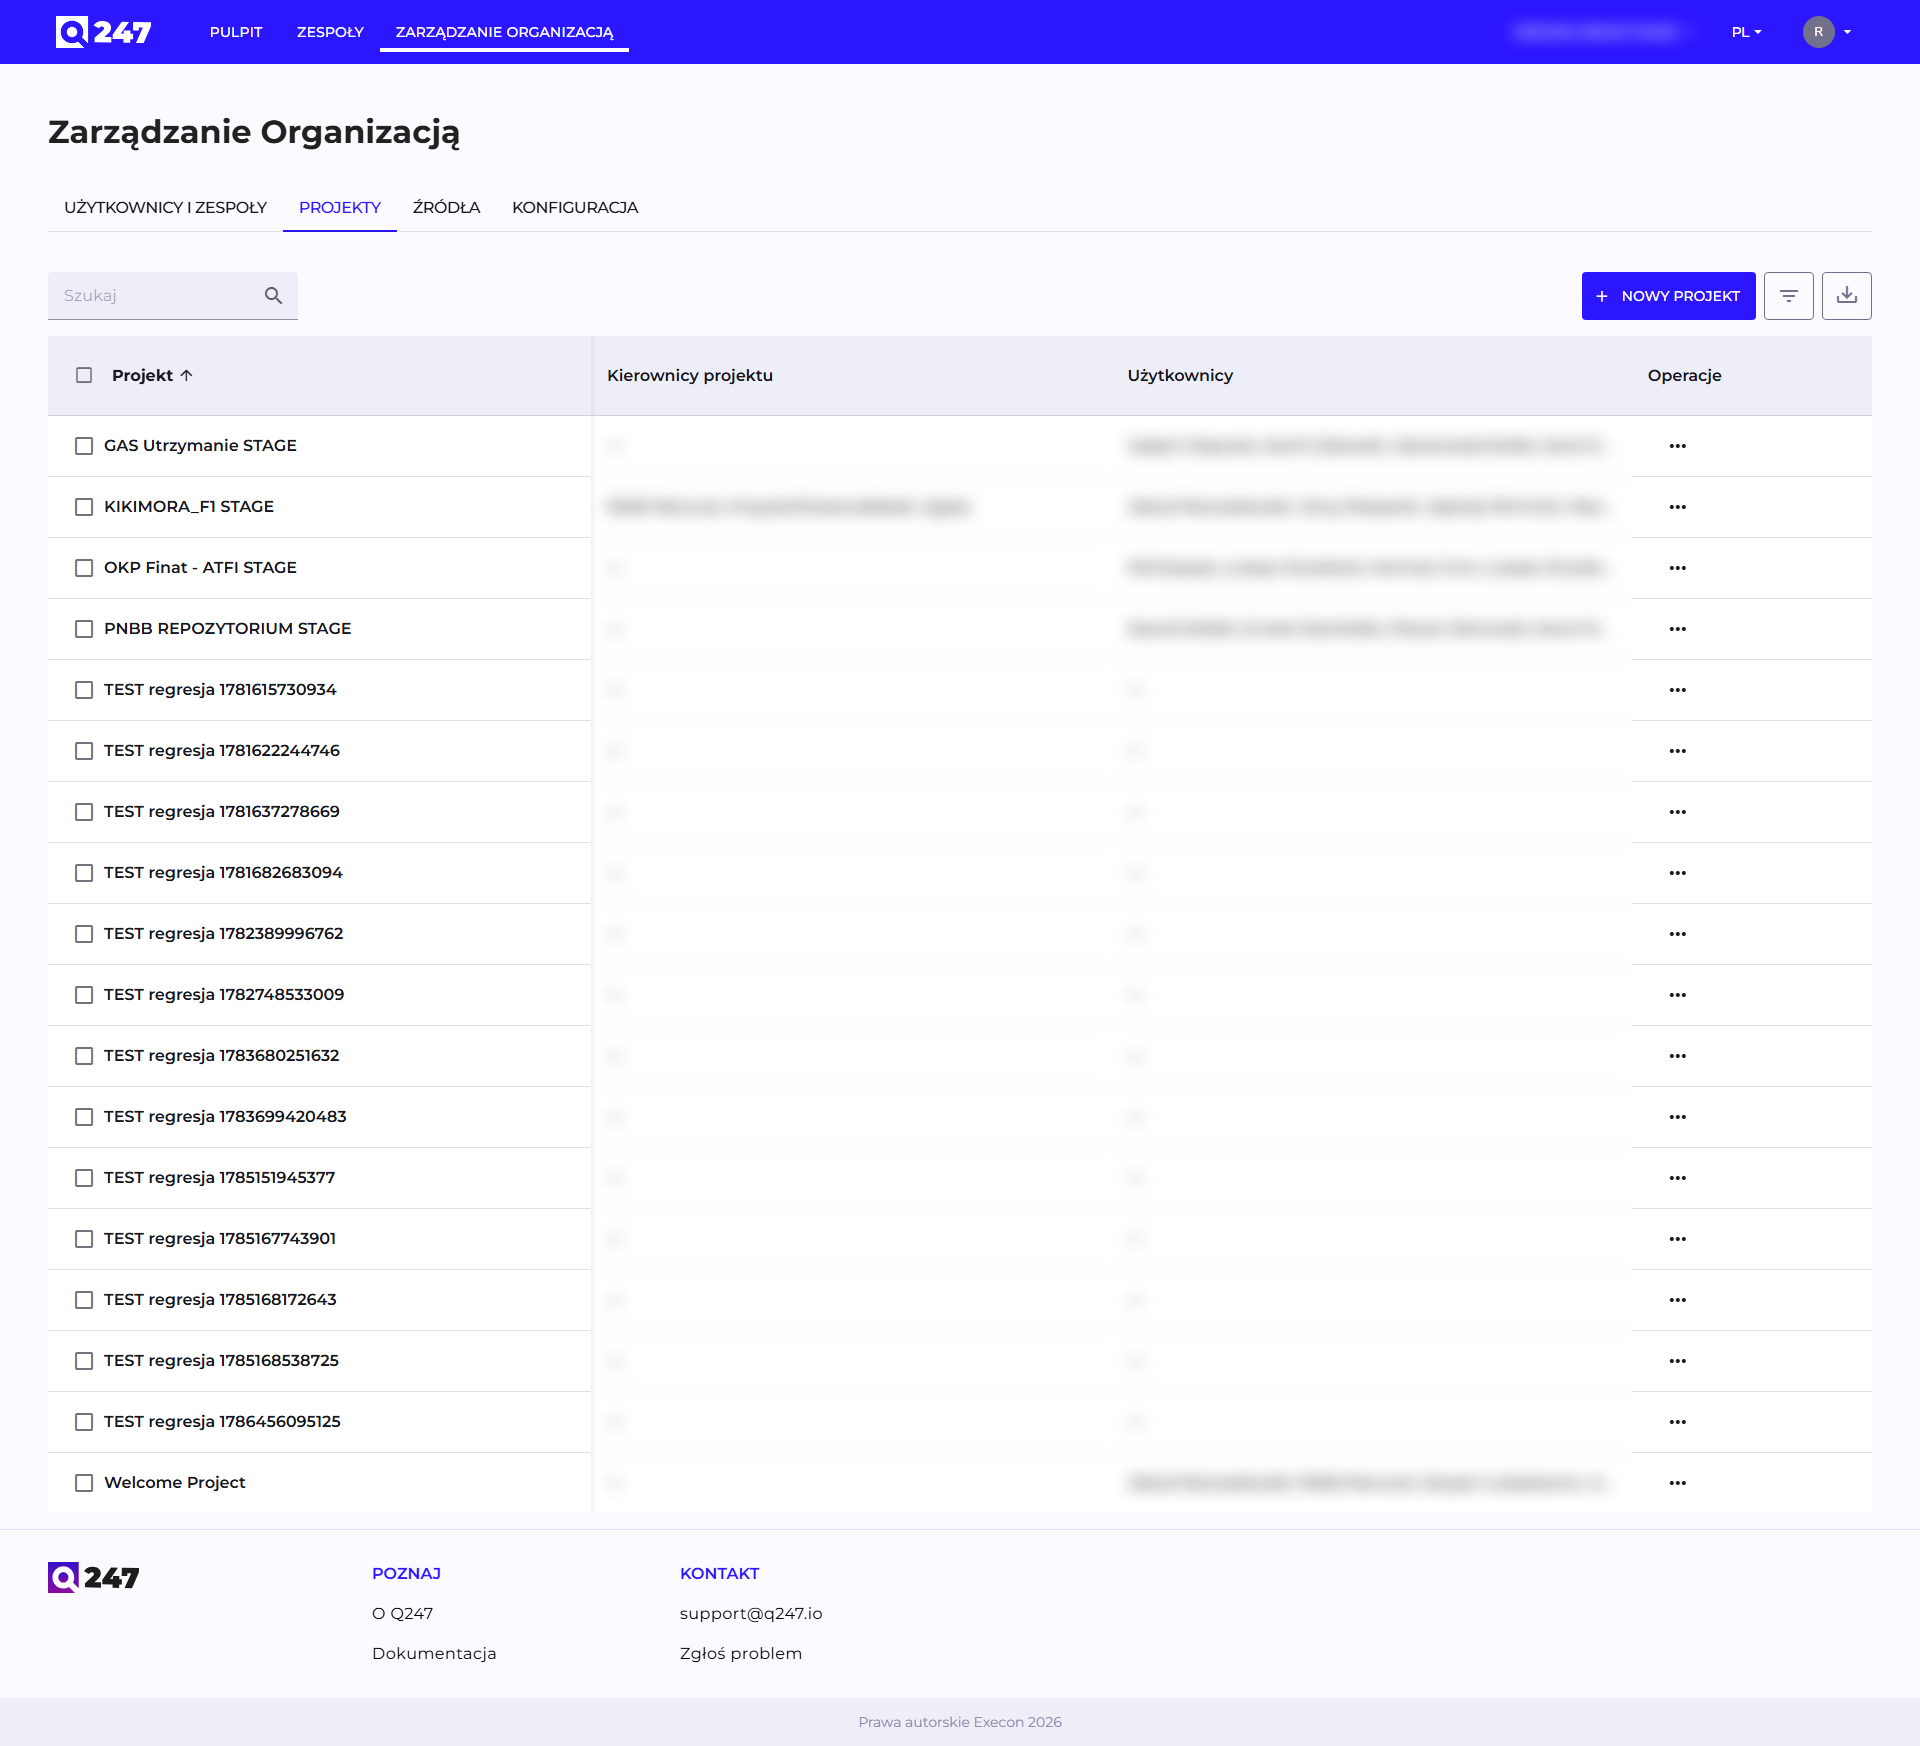
Project list
Columns: Project, Project managers, Users, Actions. The Users column shows people detected as active in the project based on commits and tickets. The list fills in automatically.
The "New Project" button creates an empty project, which still needs a data source assigned before it starts collecting data.
The "Actions" menu on each row:
- Assign project managers: grants the Manager access level to the indicated people, see Permissions.
- Assign source: attaches a repository or a documentation source from the Sources list to the project.
- Assign to team: a project can be assigned to at most one team at a time. That team's manager then automatically gets the Manager level on the project.
Project details (Manage)
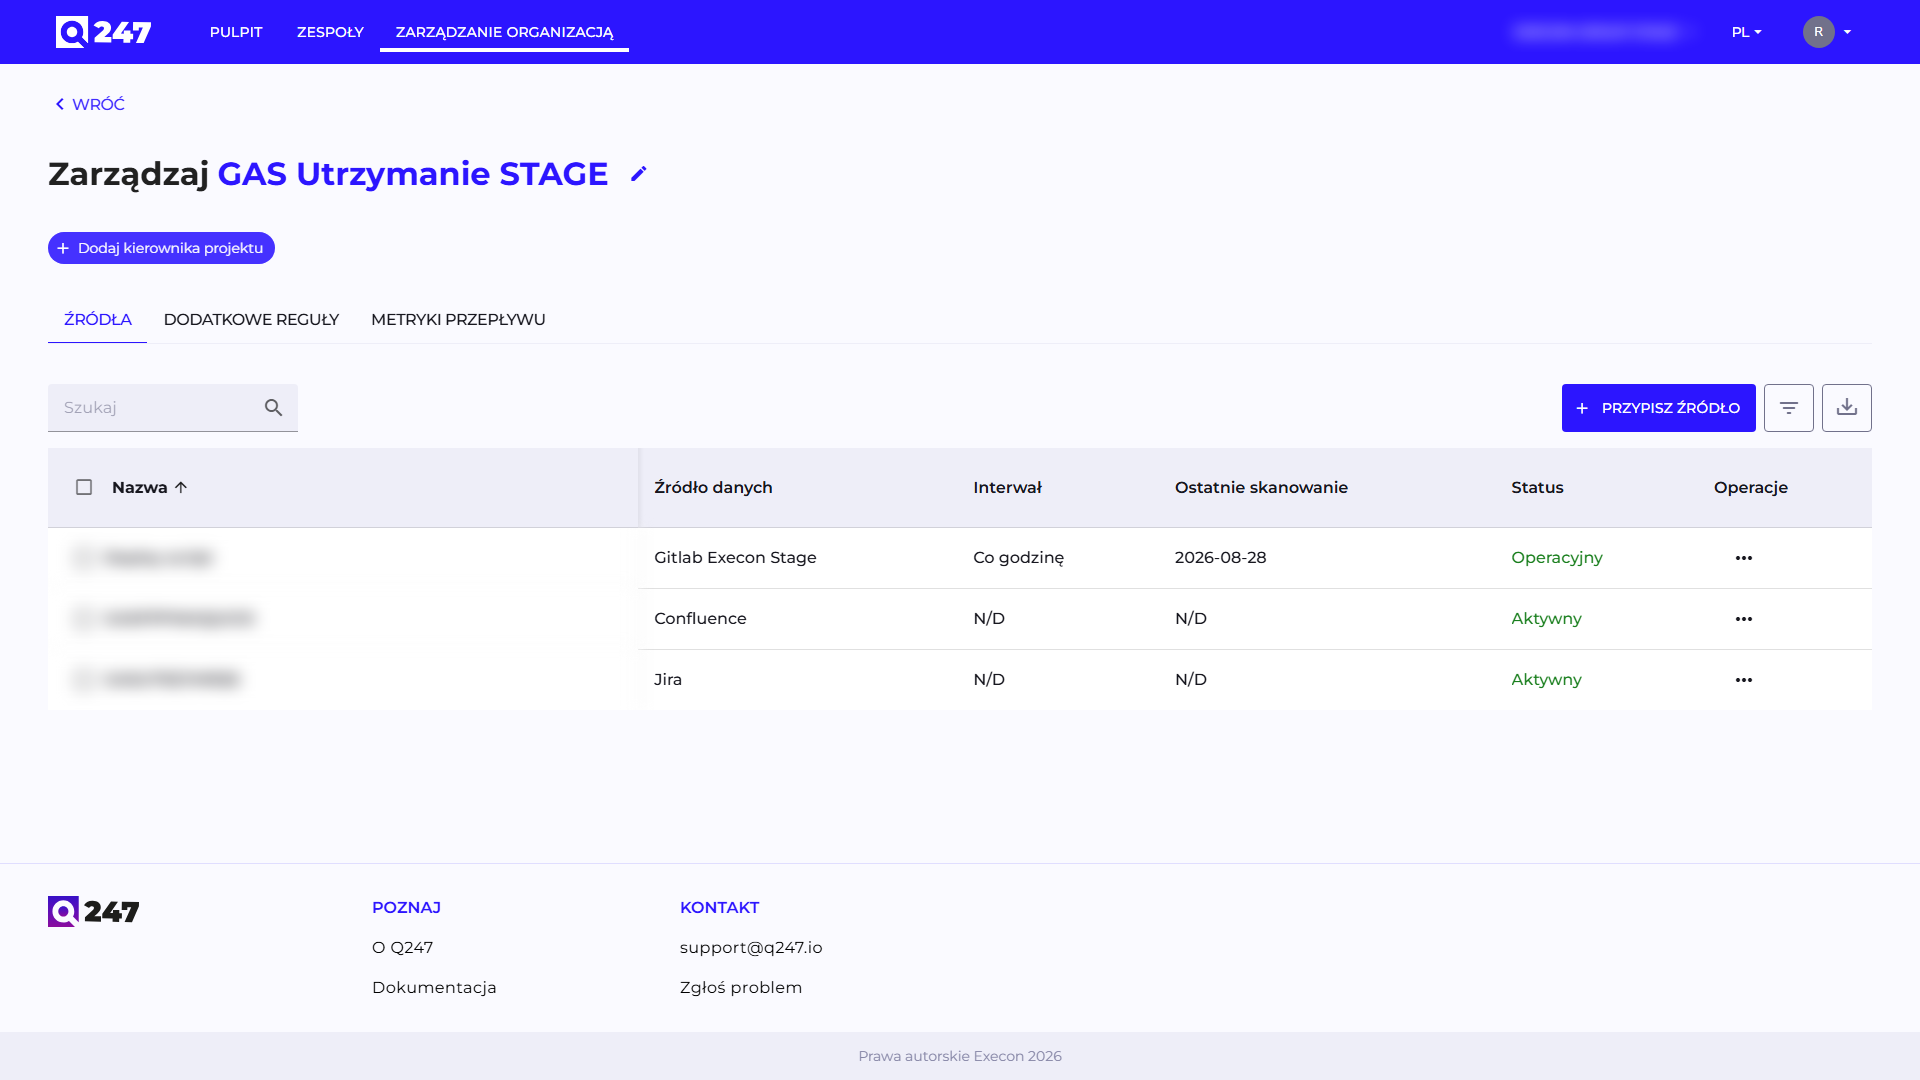
Clicking a project name on the list opens its details: three tabs side by side, Sources / Additional rules / Flow Metrics, and an "Add Project Manager" button above them.
Sources
The tab shows the table of sources assigned to this specific project (Name, Data source, Interval, Last data scan, Status, Actions), with an Assign Source button.
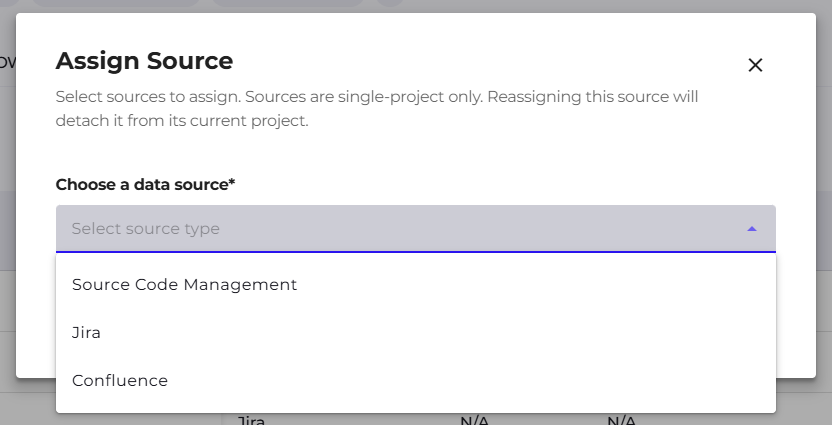
The assignment form supports five source types, chosen in the "Choose a data source" field:
| Source type | What you provide | Effect |
|---|---|---|
| Source Code Management | a specific repository from the list discovered by the connector, the scan interval and time zone | the repository gets assigned to the project, optionally with scanning starting right away |
| Jira | Jira project keys, separated by commas, for example CORE, API, PAY; each key may contain only uppercase letters, digits and underscores | events from those Jira projects flow into this Q247 project |
| Confluence | space keys, separated by commas, for example SUPPORT, DOCS, PLATFORM | events from those spaces flow into this Q247 project |
| Azure Boards | Area Path prefixes, for example MyProject, MyProject/Team A | work on work items from those areas flows into this Q247 project |
| Azure Wiki | wiki and page path prefixes, for example MyProject.wiki, MyProject.wiki/Design | work on pages from those paths flows into this Q247 project |
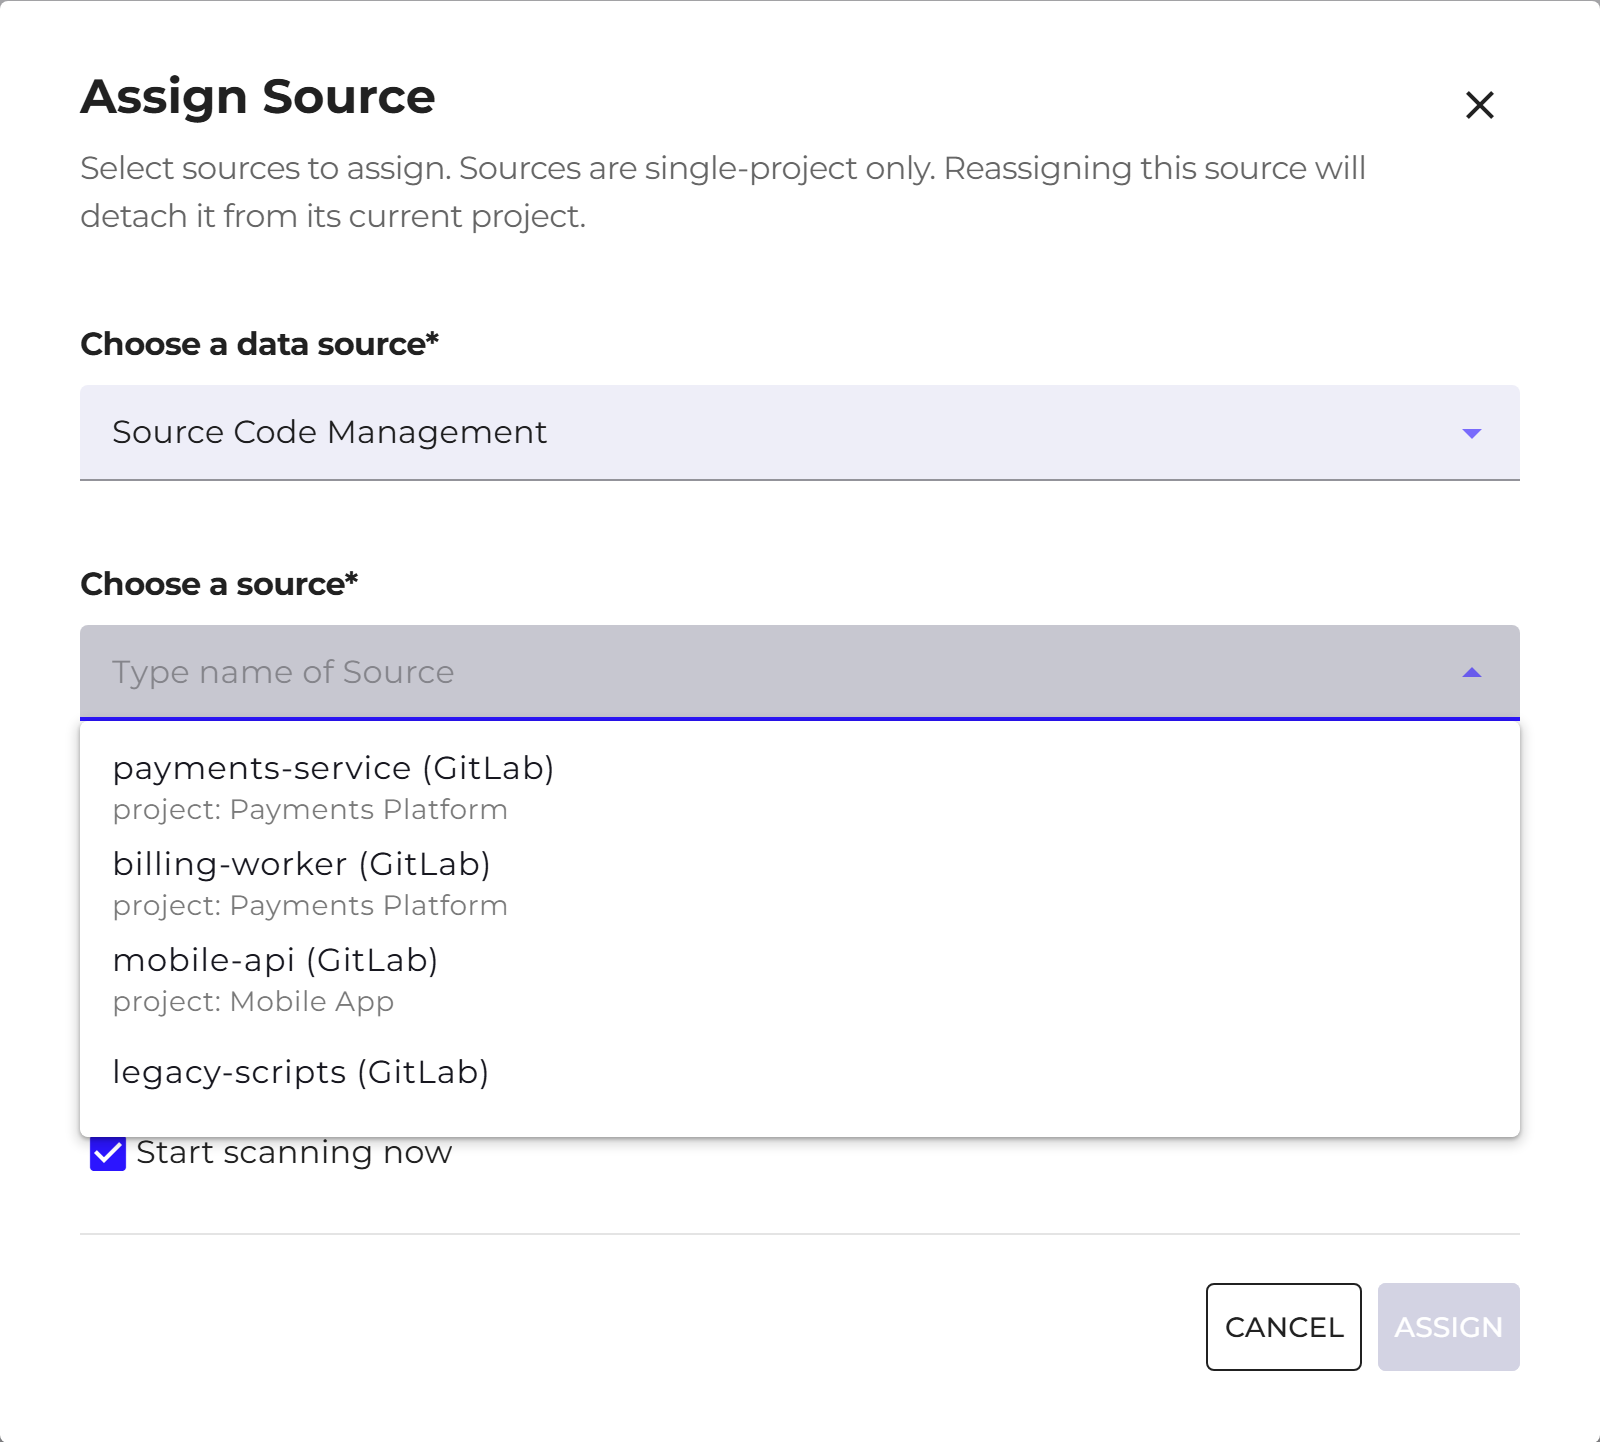
For the repository variant, there is an additional question, "Do you want to start scanning this project?", with the Start scanning now option. The documentation variants have no such choice, because they synchronize on their own rhythm.
The repository list in the form shows each repository's current project. It includes repositories in every status and omits only those that already belong to this project. Choosing a repository assigned to another project leads, before saving, to a confirmation window described in the section Moving a repository to another project.
Moving a repository to another project
A source belongs to exactly one project, so assigning a repository that is already assigned somewhere else detaches it from the previous project. Before Q247 saves the change, it shows the "Move repository to project" window with its effects. Three places open it:
- the "Actions" menu on a repository in Sources,
- the Assign Source item in the "Actions" menu on the project list,
- the Assign Source button in the project details.
Moving several repositories at once from the bulk action bar in Sources has a separate window, described in Bulk actions.
A repository that has no project yet is assigned right away, without the window. The same applies when the repository already belongs to the target project. The welcome project counts as a project, so for a repository from the welcome project the window appears.
A newly discovered repository goes to the welcome project only when automatic pickup of new repositories is running in the organization in the default mode. Without that feature it stays without a project and is assigned without the window.
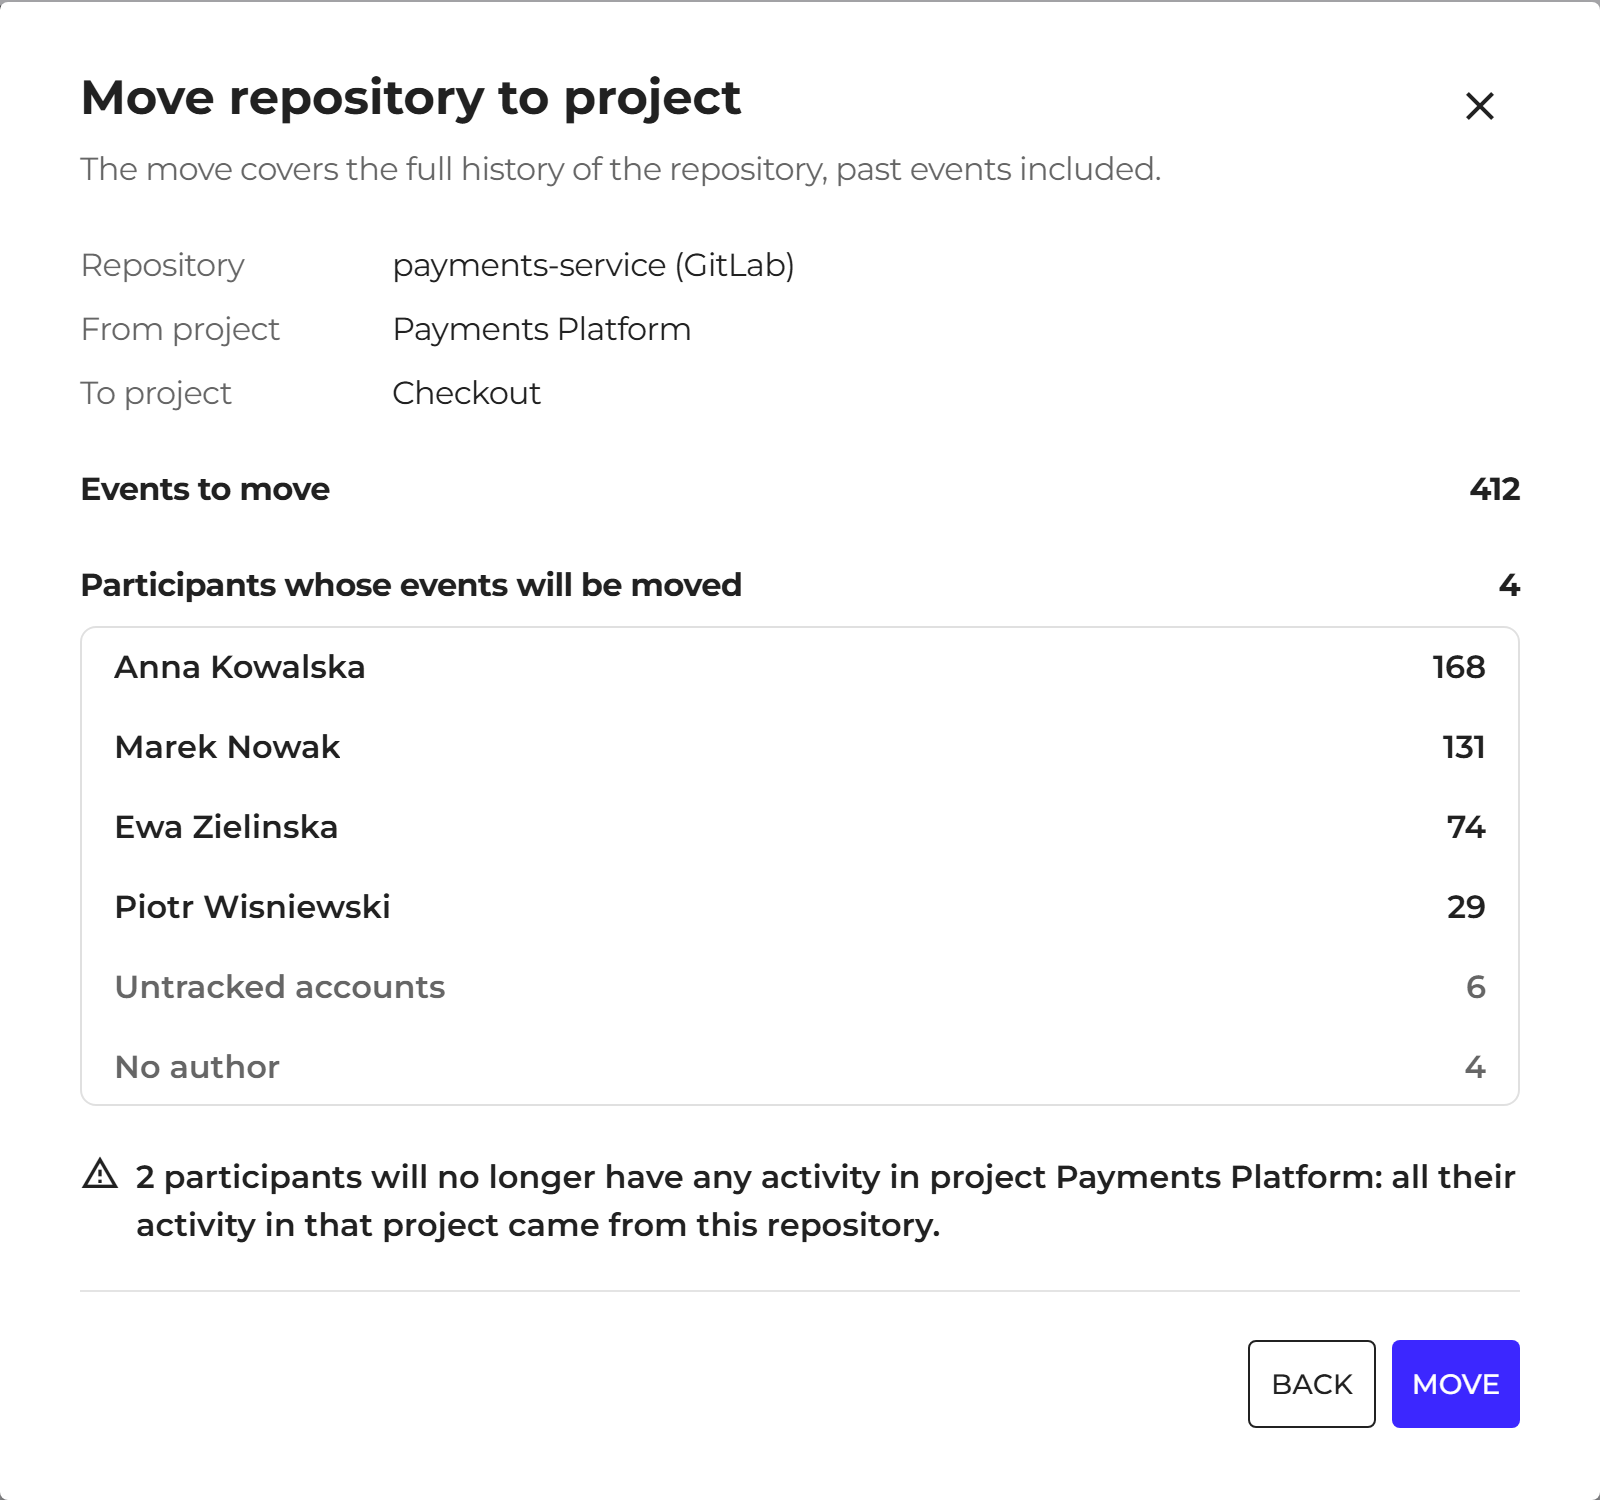
The window contains the following rows:
| Row | Content |
|---|---|
| Repository | the name of the repository being moved |
| From project | the project the repository currently belongs to |
| To project | the project chosen in the form |
| Events to move | the number of the repository's events that will change project |
| Participants whose events will be moved | the number of people, and below it each person with the number of their events, from the largest |
| Untracked accounts | the number of events authored by accounts with the Untracked status, that is bots and technical accounts |
| CI/CD deployment events | the number of deployment events from CI/CD pipelines; a deployment is not assigned to any participant |
| No author | the number of events without an author e-mail address |
The "Untracked accounts", "CI/CD deployment events" and "No author" rows appear only when the repository has such events. Each event is counted either in one of these rows or under one participant, and together they make up "Events to move".
Below the table the window states how many participants will lose all activity in the previous project, for example "3 participants will no longer have any activity in project Web: all their activity in that project came from this repository." The count includes every author of events from this repository who has no other events in the previous project, regardless of access level. People with the Manager or Viewer level are counted in it too, although they do not disappear from the project (see the effects below). When there are no such people, it shows the message "All participants keep activity in project …". A repository without events in the current project gets the message "This repository has no events in its current project. Nothing will be moved, only the project assignment will change."
The Move button saves the change. Back returns to the selection form, and the cross closes the window; neither of them saves anything. When assigning a single repository from the welcome project, the window is titled "Assign repository to project" and the save button is called Assign.
Effects of the move:
- History moves together with the source. All existing commits of that repository get reassigned to the new project, not only future ones. The old project loses them from its calculations, the new one gains them, including for periods before the change.
- Additional rules still take precedence. A commit matching an active rule goes to that rule's project, not to the project of the assigned repository. This also applies to the history being moved. The window shows such events in a separate message for each project that takes them over, for example "12 events will go to project Mobile instead of Web, according to that project's assignment rule."
- Members with no other activity disappear from the old project. A person with the Member level whose entire activity in the old project came from the moved repository stops being its participant. The Manager or Viewer level in the old project stays unchanged, even when the person is left with no events there. Anyone who becomes a participant of the new project only thanks to the moved events gets the Member level in it.
So moving a repository is for correcting an assignment. To split commits from one repository between several projects, use Additional rules, described below.
Additional rules
The rules in this tab apply to commits, not to events from documentation sources. They assign a commit to this project based on a Jira ticket key found in the commit message. The documentation sources themselves are attached with the Assign Source button in the Sources tab, described above.
Rules come in handy when work on one Q247 project is committed with references to several different ticket keys, and the repository assignment alone does not resolve it, for example when a single repository serves two business projects distinguished only by ticket key.
The ticket key is looked up in the commit message, in both its subject and body. The branch name and the content of the changes are not searched, so a key placed only in the branch name is missed.
We recommend writing the key at the start of the subject, in upper case, separated from the rest by a colon:
PAY-1042: handle partial refunds
Requirements the key must meet to be picked up:
- Upper case.
pay-1042andPay-1042will not be recognized. - The
PREFIX-NUMBERshape: a prefix of 2 to 15 characters (a letter, then letters, digits, or underscores), a hyphen, 1 to 8 digits. - A space before the key. A key stuck to a word or to a longer hyphenated chain is missed, for example
fixPAY-1042orMY-PROJECT-1042. A square bracket on its own is fine:[PAY-1042] descriptionworks. - The first key counts. A message with two keys is linked only to the first one, which is why it is worth starting the subject with the key that actually belongs to that change.
Form fields
The Add Rule button opens the "Add additional rule" window with a "Rule details" section:
| Field | What to enter | Example |
|---|---|---|
| Name | your own name for the rule, to recognize it in the list | Commits with the PAY key |
| Ticket key pattern | a pattern matched against the ticket key detected in the commit message | PAY |
| Status | Active or Inactive | Active |
The pattern matches a fragment of the key and is case-insensitive, so PAY catches both PAY-1042 and PAY-7. For the same reason it is worth writing patterns precisely: PAY also matches the key PREPAY-3.
Several keys in one rule are separated with a vertical bar, for example PAY|BILL|INVOICE. Separating them with commas will not work, because the pattern is treated as a whole.
The order of rules changes by dragging rows and decides which rule wins when a commit matches several at once: the first match counts. The order applies within a single project.
Without a matching rule, a commit stays in the project its repository is assigned to. A matching rule changes that assignment to the project the rule was created in. This is the same mechanism used to split commits from one repository between several projects.
The Inactive status turns the rule off from matching while keeping its content. It comes in handy when a redirection needs to be paused temporarily without losing the configuration.
Time scope of the rules
A rule decides a commit's assignment at the moment Q247 registers it, and that assignment is stored together with the event. This has two consequences:
- A new, changed, or removed rule applies from the moment of the change onward. Commits registered earlier stay in the projects they were assigned to at the time. The same applies to changing the Jira project keys and Confluence space keys in the Assign Source form.
- It is worth setting up rules before starting a scan, or at least before the first full run of a repository, because a later correction will no longer fix the history already collected.
If the history still needs correcting despite this, the only operation that reassigns events again is moving a repository to another project. It covers the entire history of that repository, so it is not suited to fixing individual commits.
Changing the order of rules recalculates their priorities and is saved right away.
Flow Metrics
This tab is visible only when the project has a ticketing integration (Jira) attached. It lets you override, for this one project, the Flow Metrics boundaries set globally for the organization in Configuration.
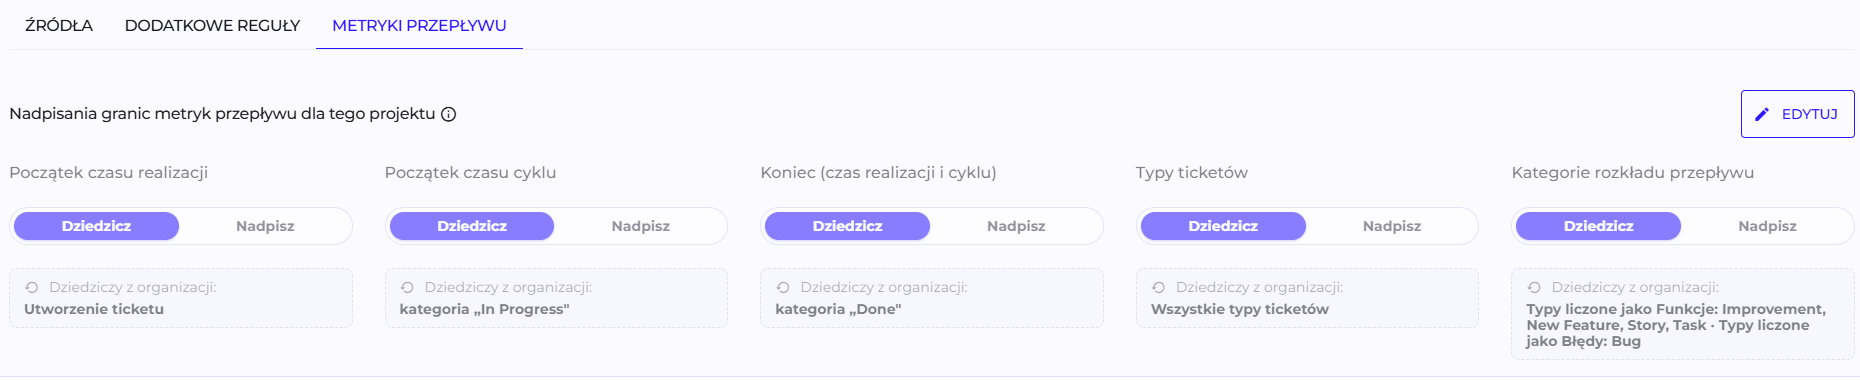
The "Flow Metrics boundary overrides for this project" heading gathers five settings, each with its own Inherit / Override switch:
| Setting | What it covers |
|---|---|
| Lead Time start | the start of Lead Time |
| Cycle Time start | the start of Cycle Time |
| End (Lead & Cycle) | the end shared by both metrics |
| Ticket types | which types enter the calculations |
| Flow distribution categories | which types count as Features and which as Bugs |
By default every one of them stands on Inherit, and under the switch you see the value inherited from the organization, labeled "Inherits from organization". A project with no override at all is therefore counted exactly like the rest of the organization, and a later change to the organization setting carries over to it automatically.
Switching a single field to Override cuts it off from the organization and requires its own value; the other four fields keep inheriting. Overriding the start or end boundary recalculates that project's metrics retroactively, the same way changing the boundary at the organization level does.
More on the metrics themselves in Flow Metrics.
See also
- Sources: the full list of the organization's data sources, regardless of project assignment
- Permissions: how assigning a project manager translates into an access level
- Flow Metrics: what Lead Time and Cycle Time mean